The AIM Planning tool needs to be configured to your company’s specific operation. The process is simple and we are going to describe each step in this section.
From the “Inventory Planning” menu, you can start the wizard by clicking on “Start Planning Wizard” link. You will also have a top menu with new options:

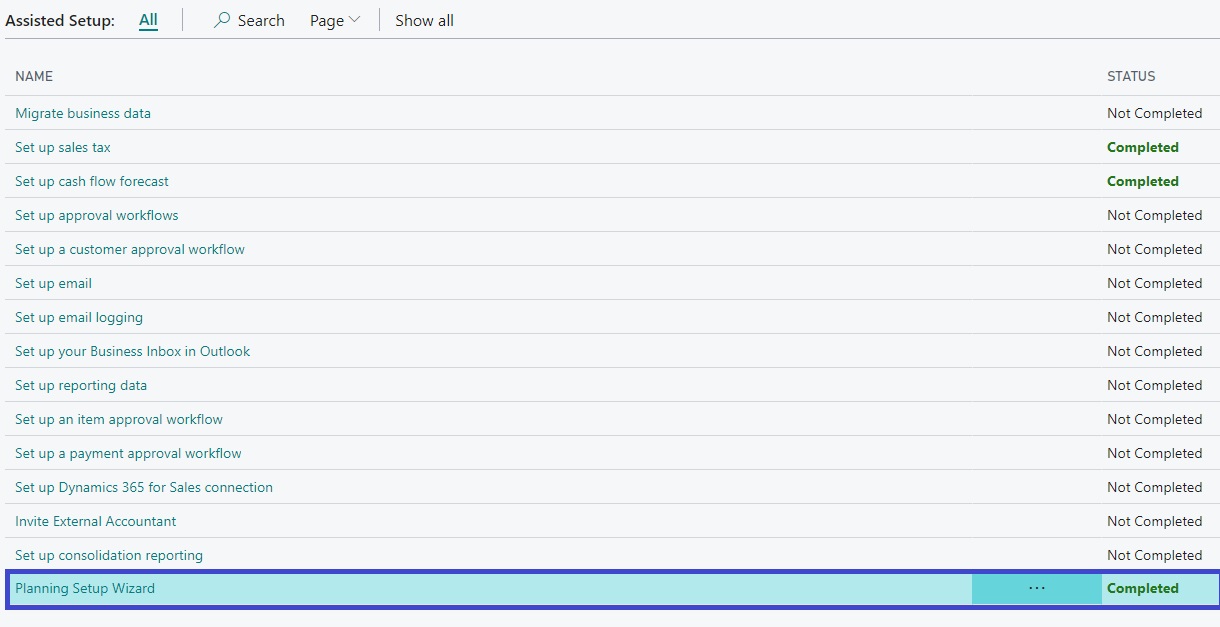
Click on “Assisted Setup” and then select “Planning Setup Wizard”:
You will be greeted with the Planning Tool. Click “Next”

Basic Settings:
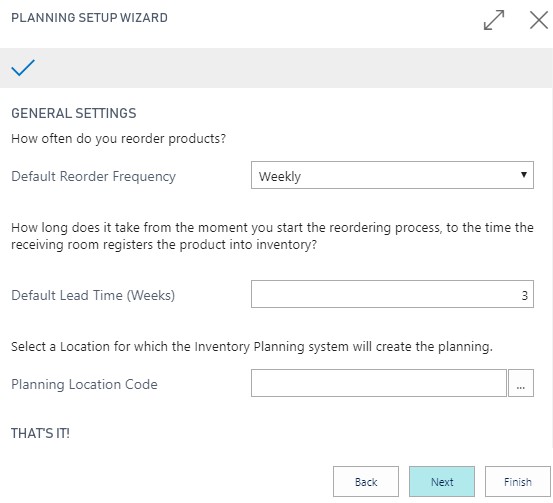
You have a choice on how to setup the AIM Planning Tool. If you just want to configure the basic settigs, then simply answer these 3 questions to complete the Basic settings and click “Finish”:
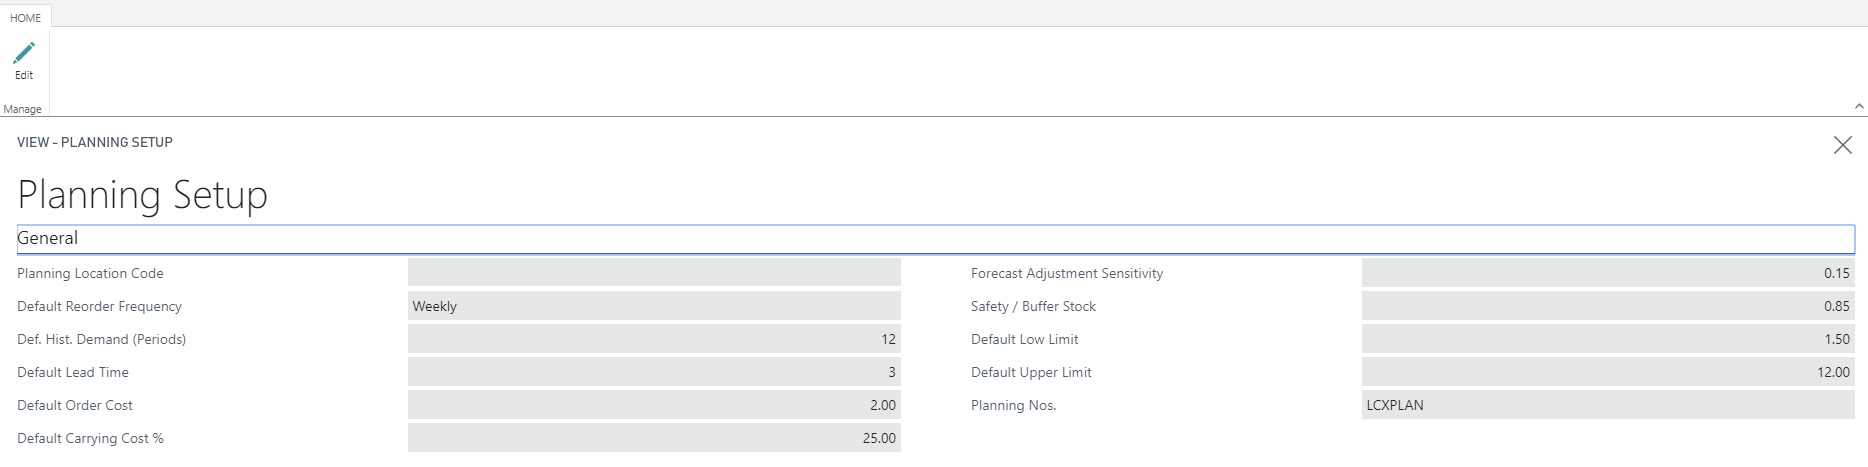
- Default Reorder Frequency: How often do you reorder products? Stores usually place orders on a daily or weekly basis. This will determine how the system will organize the usage history and lead-times. Our recommendation is to order on a weekly basis on a pre-established day of the week.
- Default Lead Time: Your lead-time is how long it takes to get product at your warehouse from the moment you start the ordering process, to the time the products are available to fulfill an order (quote, placing orders, approvals, shipping by vendor and receiving). It should be expressed in the same time unit as your time buckets. For instance, if you are ordering every week, then your lead-time should be established in weeks. You can set the lead-time for each item by using the “Item Card” menu.
- Planning Location Code: just select the warehouse you want to run the calculations for. If you have multiple warehouses, select the primary warehouse, complete the setup, and then run the setup one more time with the specific values for the 2nd, 3rd or more warehouses.
That’s it for the Basic Setup! You have completed the setup process for the app. If you want to configure advanced settings, just click on “Next”.
Advanced Settings:
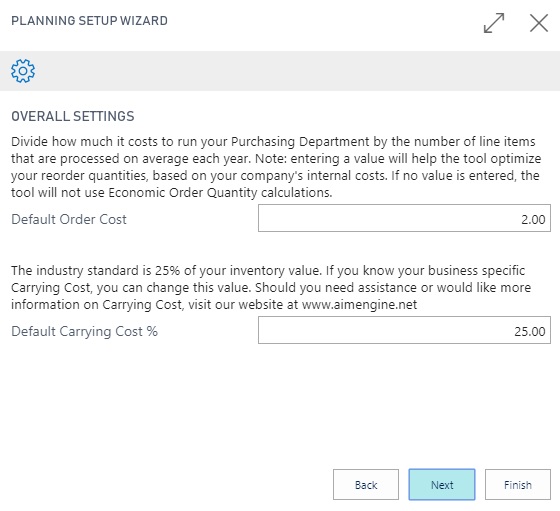
In this screen, you are being asked for 2 important values. The AIM Planning tool is designed to consider how much it costs you to order new products and store them, to optimize your order quantities. You will find default values already entered based on business averages, but we recommend you change them based on your company’s industry and operation specifics. Let’s go over each value in more detail:
- Default Order Cost: To help determine optimum ordering quantities, the tool needs to consider how much it costs for your business to order each item. Note this is NOT the item price or shipping charges paid to the supplier. To determine your ordering cost, you need to add up all of your costs associated in the process: for example, salaries of employees that order items, administration costs related to ordering, tools, etc. of one year; and divide this value by the total line items ordered in a year. By default, if you do not have an established value, the tool will take an industry standard of $2 of cost per line item.
- Here is an example to explain how to calculate it: Company X has 5 employees; 1 employee (yearly salary is $30,000) is responsible for placing orders and spends 15% of the time ordering products. The company also spends $3,000 per year in office supplies and software tools related to purchasing from vendors. Last year, the company placed 2,500 line items on the purchase orders. Here is the math to calculate the Order Cost:

- Default Carrying Cost: The AIM Planning tool also needs to take into consideration how much it costs you to hold items in inventory. This value is expressed in a percentage; that means that 25% should be entered as 25, not 0.25. For this field, take under consideration the following factors: capital cost, storage space cost, inventory services, inventory risks, and shrinkage. By default, if you do not have an established value, the tool will take an industry standard of 25%.
- Example:
- Company X averages an inventory in stock of $1,000,000.00.
- Capital cost: the company has a 8% blended cost of financing or company equity.
- Their warehouse and utilities associated to storage total $90,000 last year.
- They have 1.5 employees responsible for the warehouse (yearly salary is $30,000 for each employee; 1 is part-time) = $45,000.
- The inventory insurance is 3%.
- Shrinkage: the yearly cost of misplaced items, damaged, lost or stolen material averages $20,000.

Click to continue to the following page:

Forecast Settings

- Forecast Adjustment Sensitivity: The AIM Planning tool will adjust the forecast each time you run it based on how accurate it was. It compares your demand vs. your forecast and learns from it. This is very helpful because it increases or decreases the forecast when your products demand is on an upper or lower trend. Also needs to take into consideration how much does it cost you to hold items in inventory.Enter a value between 0.00 and 1.00. A high value will give make adjust faster to the last period’s demand. Similarly, a low value will make your new forecast adjust slower as time goes by. Our recommendation is to start with a value of 0.15 and change it later if you desire a faster result. You can also adjust this value for a specific item.For example, if you have a product that is new to the store and with a very rapid growth rate (i.e. a new and popular gadget or clothing item), then you can finish the setup with a low value for all items, but then go to the “Item Card” and place a higher value just for that item.
- Safety / Buffer Stock: this is your level of protection against unexpected demand. The options are between 50 to 99%. Higher service factor values represent higher inventory availability but the amount of dollars invested will grow exponentially. Our recommendation is that you start with a value of 85% and wait at least 12 weeks to allow the forecast to improve and later on you change it if you desire a different result. Same as with other AIM Planning values, you can adjust them on the “Item Card” menu.
Click to continue to the following page:
Make sure the Planning Setup Wizard shows “Completed” before you proceed to running the Planning tool:

On the next section, we will show you how to run your daily or weekly Planning calculations.
Setup Adjustments
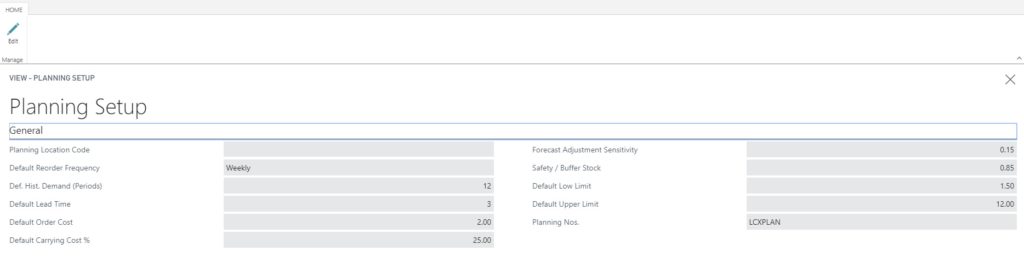
If you need to make any adjustments to the values entered previously, you don’t need to run the Assisted Setup again. Instead, click on “Planning Setup”, click on “Edit” and update the values you desire.

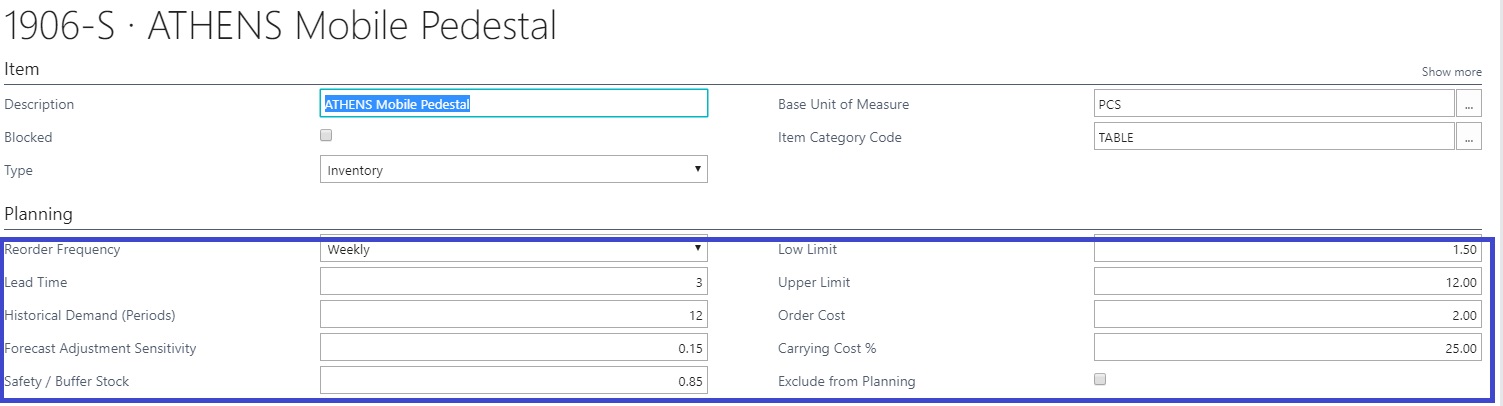
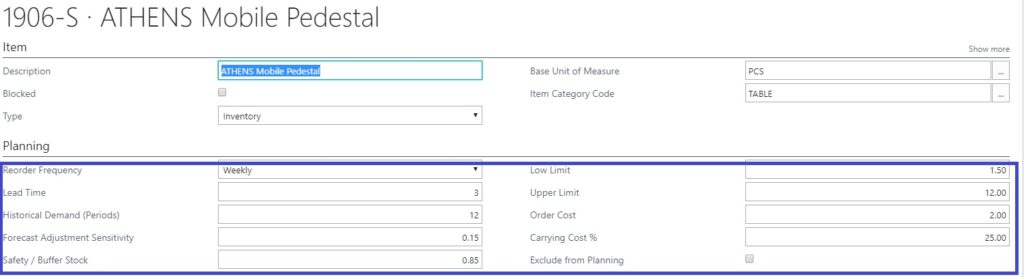
Edit from the Item Card
You can also edit a specific item setting by going to the Item menu, clicking on the item number and then expanding the “Planning” section as show below:
Exclude Items
By default, the AIM – Planning tool will include all items in the Planning Card (calculation). There may be items in your inventory that are slow movers, obsolete, or that because of market changes, you do not want to replenish. If you want to exclude any item, go to the “Item Card” and check the box under the Planning subsection titled “Exclude from Planning”.

Run the Inventory Planning Tool:
Upon completing the setup process, you are now ready to start running the tool. Click the “Inventory Planning” menu.

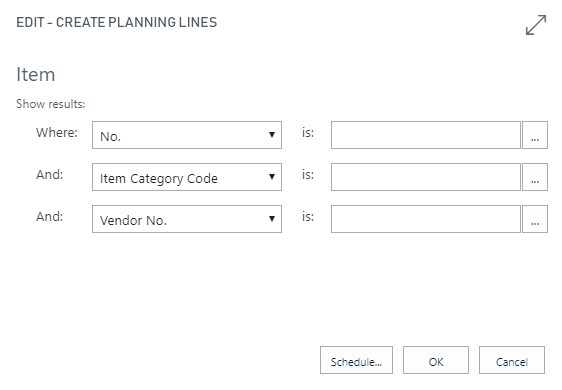
Click on any of the “New” options as highlighted on the picture below:

This will bring up the “Planning Card” page. Here is information on what to do for each field:
- No.: no need to enter any information here.
- Location Code: this field is automatically populated based on your selection from the Setup Wizard.
- Planning Date: This date represents the day you are running your planning calculations. The value will default to your current date.
- Reorder Frequency: this field is automatically populated based on your selection from the Setup Wizard
- Time Bucket: this number cannot be changed; it is calculated on your behalf based whether you chose Daily or Weekly ordering; this is your historic demand used for the forecast.
The Planning card first appears blank; skip to the “Planning Date” field:

The No., Location Code and other fields will populate automatically:

Click on “Calculate Planning”

On the next screen, select “Schedule” if you want this calculation to be ran automatically and in the future, or select “OK” to run it immediately.
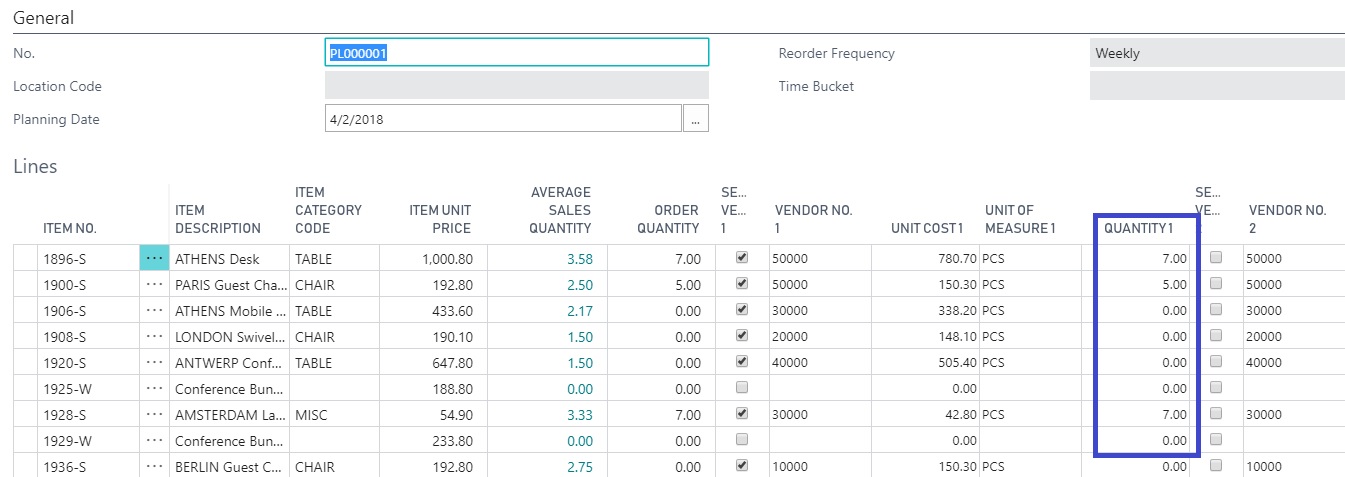
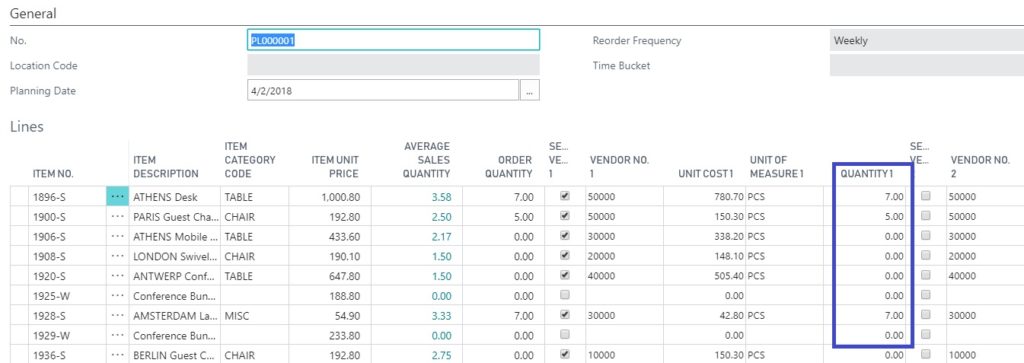
The Planning Card will then generate a table with the list of Items and how much to order:
The first time you run the tool, the “Previous Forecast” field will be based on your average historic demand (12 weeks if you order weekly). The next time you order, it will utilize the forecast created from this tool on the previous period, which will help the tool learn and adjust the quantities as it gathers more data.
Columns Description:
- Average Sales Quantity: your average historic sales based on your time bucket (30 days if ordering daily, 12 weeks if ordering weekly).
- Order Quantity: how much product you need to order based on the forecast, items in stock, items in transit, lead-time and safety stock.
- Select Vendor: if working with multiple vendors for the same item, you can choose to split your Purchase Order or select a specific vendor. The tool is setup to show 1 vendor, but you can display up to 3 by adding more columns. To add more columns right click the title section of the columns and click “Choose Columns”. From the list, put a check on “Select Vendor 2, Vendor No. 2, Unit Cost 2 and Quantity 2, etc.”.
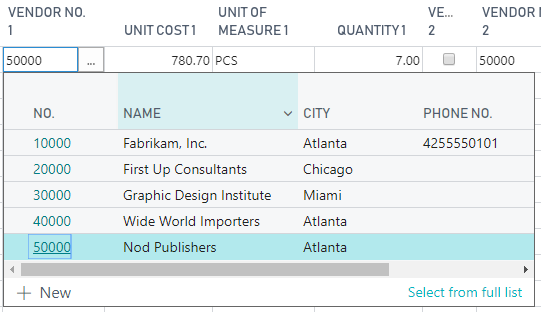
- Vendor No 1: select the vendor you want to order from.
- Unit Cost 1: how much it was paid to this vendor on the last purchase order placed.
- Quantity 1: how much you ordered from this vendor on the last purchase order.
IMPORTANT: Please be sure to select at least Vendor 1, and that Order Quantity, Unit Cost and Unit of Measure fields are populated, otherwise, the tool will not generate the purchase orders.
Multiple Suppliers:
If you order from multiple suppliers, the AIM – Planning Tool adds several columns to the right on the Planning Card, showing the Unit Cost and Unit of Measure (i.e. PCS for pieces, Dozens, kg, etc.).
Select the vendors you will like to Submit a Quote Request or Purchase Order, by clicking on the check box.
Item Details – Planning:
When opening the Planning Card, if you highlight or click on a line item, the “Item Details – Planning” section will be displayed on the right side. This section includes the item’s lead time, quantity on hand, items in transit (“Qty. on Purch. Order”), etc.

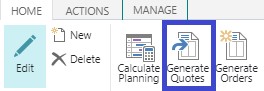
Generate Quotes:
Once you are satisfied with the selections in your Planning Card and have reviewed the information, you can proceed to generate the Purchase Quotes. Some companies need to submit a Purchase Quote to a vendor to confirm the price. The AIM Planning Tool is smart to combine all the purchases by vendor. This will save you a lot of time and create the documents on your behalf.
1.From the Planning Card windows, click on “Generate Quotes”. The AIM Planning Tool is smart to combine all the purchases by vendor. This will save you a lot of time and create the documents on your behalf. Click “OK” to accept the pop-up message.
2.Go to “Purchasing” on the left menu and then click “Purchase Quotes”. Notice there will be several Purchase Orders based on the quantity calculated on the Planning Card and grouped by Vendor.

3.The Purchase Quotes are now ready to be sent. Open each Purchase Quote, review them, make any adjustments, and then follow your standard communication with your vendor to adjust the prices. The “Direct Unit Cost” value is based on the last purchase price used with each vendor and product.
4.Once you have received a reply from each vendor, you can convert the Quote to a Purchase Order by clicking the “Make Order” button or simply go back to the Planning Card and follow the next steps.
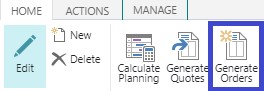
Generate Purchase Orders:
Once you are satisfied with the selections in your Planning Card and have reviewed the information, you can proceed to generate the Purchase Orders. The AIM Planning Tool is smart to combine all the purchases by vendor. This will save you a lot of time and create the documents on your behalf.
1.Proceed to generate the Purchase Orders by clicking on Purchasing menu and then click on “Purchase Orders”. The AIM Planning Tool is smart to combine all the purchases by vendor. This will save you a lot of time and create the documents on your behalf.
2. Go to “Purchasing” and then to the “Purchase Orders”. Notice there will be several Purchase Orders based on the quantity calculated on the Planning Card, and grouped by Vendor. The Purchase Orders are not posted; once you review the information and are satisfied with the data, you can go ahead and post them.

3. The Purchase Orders are not posted just yet; once you review the information and are satisfied with the data, you can go ahead and post them. You can open each of them to make any adjustments. You will need to enter a Vendor Invoice No. before you can post each Purchase Order.

4. This completes the Purchase Order.
IMPORTANT: if you are not able to see “Purchase Orders” from the “Purchasing Menu” is because you are working on the “Basic” Experience. It is required that you switch to the “Essential” experience to generate Purchase Orders. To change the experience, click on the find magnifying glass icon on the top right, type “Company Information”, and at the bottom, change the selection from “Basic” to “Essential”.